What Is a CHA Fan (2026 Complete Guide)
Last updated: July 19, 2026 | Estimated reading time: 10 minutes
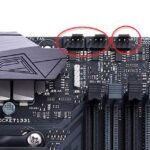
When you open your PC case and look at your motherboard, you will notice several fan headers scattered across the board. Some are clearly labeled CPU_FAN or SYS_FAN, but one label that often confuses builders is CHA_FAN. If you have ever looked at your motherboard manual or BIOS and seen the term CHA_FAN and wondered what it means, you are not alone. CHA_FAN stands for chassis fan, and it is the header on your motherboard designed specifically for connecting case fans. In this guide, we will explain what a CHA_FAN header is, how it differs from other fan headers, and how to use it properly in your PC build.
Table of Contents
- What Is CHA_FAN?
- CHA_FAN vs. CPU_FAN
- CHA_FAN vs. SYS_FAN
- Pin Configuration
- Fan Speed Control
- Multiple CHA_FAN Headers
- How to Connect Fans to CHA_FAN
- Fan Splitters and Hubs
- Setting Up Fan Curves in BIOS
- Frequently Asked Questions
What Is CHA_FAN?
CHA_FAN is short for chassis fan. It is a fan header on your motherboard that is designed to power and control case fans. The chassis is the metal or plastic enclosure that holds all your PC components, and chassis fans are the fans mounted to the case to provide airflow. The CHA_FAN header provides both power to run the fan and a signal wire that allows the motherboard to control the fan speed. This means that when you connect a fan to the CHA_FAN header, your motherboard can automatically adjust the fan speed based on temperature readings from the system.
CHA_FAN headers are typically located along the edges of the motherboard, often near the top or bottom edges where case fan cables can reach them easily. The exact number of CHA_FAN headers varies by motherboard. Budget boards may have only one or two, while high-end boards can have four or more. Some modern motherboards have moved away from the CHA_FAN label and use the more generic SYS_FAN designation instead, but the functionality is essentially the same. Both CHA_FAN and SYS_FAN headers are designed for case fans and provide the same power and control capabilities.
CHA_FAN vs. CPU_FAN
The most important distinction to understand is between CHA_FAN and CPU_FAN. The CPU_FAN header is specifically designed for your CPU cooler’s fan. It is usually located near the CPU socket and is the only header that the motherboard will check during the Power-On Self-Test (POST). If no fan is detected on the CPU_FAN header, many motherboards will refuse to boot and will display an error message. This is a safety feature designed to prevent your CPU from overheating if the cooler fan is not connected.
The CHA_FAN header does not have this safety check. If you leave the CHA_FAN header empty, your motherboard will boot normally. The CHA_FAN header is also typically rated for a different maximum current than the CPU_FAN header. Most CHA_FAN headers can deliver up to 1 amp of current, which is enough for standard case fans but may not be sufficient for very high-power fans or fan motors with startup current spikes. Understanding this difference helps you plan your fan layout and ensures you connect each fan to the appropriate header.
CHA_FAN vs. SYS_FAN
On many modern motherboards, the CHA_FAN label has been replaced with SYS_FAN. These two labels refer to the same type of header. Both are designed for system fans, which is another term for case fans. If your motherboard has only SYS_FAN labels and no CHA_FAN labels, do not worry. You can connect your case fans to any SYS_FAN header just as you would to a CHA_FAN header. The functionality is identical.
Some motherboards may have multiple SYS_FAN headers, each with slightly different power delivery capabilities or fan control zones. For example, one SYS_FAN header might control the front intake fans while another controls the rear exhaust fans. This allows you to set different fan curves for different fan groups. Check your motherboard manual for details on how your specific board handles fan zones and which headers fall into each zone. For information on how fan performance is measured, see our guide on how computer fans are measured.
Pin Configuration
CHA_FAN headers come in two common configurations: 3-pin and 4-pin. A 3-pin header provides power, ground, and a tachometer signal for reading the fan speed. A 4-pin header adds a PWM (Pulse Width Modulation) signal that allows for more precise speed control. Most modern motherboards use 4-pin headers, but some budget boards still include 3-pin headers. The good news is that both 3-pin and 4-pin fans are backward and forward compatible. You can plug a 3-pin fan into a 4-pin header, or a 4-pin fan into a 3-pin header, and the fan will work. However, the speed control method may differ depending on the combination.
When a 3-pin fan is connected to a 4-pin header, the motherboard uses voltage regulation to control the fan speed. This method is less precise than PWM but works well for most fans. When a 4-pin PWM fan is connected to a 4-pin header, the motherboard uses the PWM signal for precise speed control, which is generally smoother and more efficient. If you are building a new PC, using 4-pin PWM fans with 4-pin headers gives you the best fan control experience. Learn more about the differences between 3-pin and 4-pin fans in our guide on can 3-pin fans plug into 4-pin.
Fan Speed Control
One of the main benefits of connecting your case fans to CHA_FAN or SYS_FAN headers is automatic fan speed control. Your motherboard reads the temperature from various sensors throughout the system and adjusts the fan speed accordingly. This means your fans will spin faster when your components are under load and slower when the system is cool. This automatic control helps keep your system quiet during light use while providing adequate cooling during heavy workloads.
Fan speed control can be configured through your motherboard’s BIOS or through the motherboard manufacturer’s software utility. Most BIOS interfaces allow you to set custom fan curves, which define how fan speed responds to temperature changes. You can typically set a minimum fan speed for quiet operation and a maximum fan speed for peak cooling. Some motherboards also offer preset fan profiles like Silent, Standard, and Performance that automatically configure the fan curve for you. If you prefer not to use the BIOS, most motherboard manufacturers offer Windows-based utilities that provide the same fan control features.
Multiple CHA_FAN Headers
If your motherboard has multiple CHA_FAN headers, you have several options for connecting your case fans. You can connect one fan to each header, or you can use fan splitters or hubs to connect multiple fans to a single header. The key consideration is the maximum current each header can deliver. Most CHA_FAN headers can handle up to 1 amp, which is enough for two or three standard case fans. However, if you are using high-performance fans with higher current draw, you may need to spread the load across multiple headers.
Some motherboards group CHA_FAN headers into zones that share a single temperature sensor and fan curve. For example, all the headers on the right side of the board might be controlled by the same fan curve, while the headers on the left side use a different curve. This zoning feature can be useful for creating distinct airflow patterns, such as having aggressive intake at the front and quieter exhaust at the rear. Check your motherboard manual to see if your board supports fan zoning and how to configure it.
How to Connect Fans to CHA_FAN
Connecting a fan to a CHA_FAN header is straightforward. First, identify the CHA_FAN header on your motherboard. It will be labeled CHA_FAN1, CHA_FAN2, or similar. Next, locate the fan cable from your case fan. The connector will have either 3 or 4 pins. Align the connector with the header pins, making sure the notch on the connector lines up with the tab on the header. Gently push the connector onto the header until it is fully seated. Make sure the fan cable does not interfere with other components like the GPU or RAM.
After connecting the fan, power on your computer and enter the BIOS to verify that the fan is detected and spinning. Most BIOS interfaces display the current fan speed for each connected fan. If the fan is not detected, double-check the connection and make sure the fan cable is fully seated on the header. If the fan is connected but not spinning, check if the fan cable is damaged or if the fan itself is defective. Some fans require a minimum voltage to start spinning, so if the BIOS is set to run the fan at a very low speed, it may not start. Increasing the minimum fan speed in the BIOS settings usually resolves this issue.
Fan Splitters and Hubs
If you have more case fans than CHA_FAN headers, you can use fan splitters or fan hubs to connect multiple fans to a single header. A fan splitter is a simple Y-cable that splits one header into two or more fan connectors. Fan hubs are more complex devices that can power and control multiple fans from a single motherboard header. Both options have their advantages and limitations.
Fan splitters are cheap and easy to use, but they have a few limitations. First, they split the available current between all connected fans, so you need to make sure the total current draw does not exceed the header’s limit. Second, when using a fan splitter, all connected fans will run at the same speed since they share the same control signal. If you want independent speed control for each fan, a fan hub with its own controller is a better option. Some advanced fan hubs can even read individual fan speeds and provide separate PWM control for each fan. When using splitters or hubs, always check the power requirements of your fans and the current capacity of the header to avoid overloading.
Setting Up Fan Curves in BIOS
Fan curves are one of the most powerful features available through your motherboard’s BIOS. A fan curve is a graph that defines the relationship between temperature and fan speed. By setting up a custom fan curve, you can fine-tune how your case fans respond to temperature changes. Most BIOS interfaces let you set multiple points on the curve, allowing you to create a custom profile that balances noise and cooling performance.
To set up a fan curve, enter your BIOS during boot by pressing the designated key (usually Del or F2). Navigate to the hardware monitoring or fan control section. You should see options to set fan profiles or create custom curves. A typical approach is to set the fans to run at minimum speed (around 30-40%) when the system is below 40 degrees Celsius, gradually increase speed as temperature rises, and ramp up to 100% when the temperature exceeds 70-80 degrees Celsius. This keeps the system quiet during light use while providing maximum cooling when needed. Save your settings and exit the BIOS. The fan curve will take effect immediately and will be active every time the system boots.
Frequently Asked Questions
What does CHA_FAN stand for?
CHA_FAN stands for chassis fan. It is a motherboard header designed for connecting and controlling case fans that provide airflow to your PC components.
Can I connect a CPU cooler fan to a CHA_FAN header?
Physically, yes. However, it is not recommended. The CPU_FAN header has special boot-time checks and may have different power specifications. Always use the CPU_FAN header for your CPU cooler to avoid boot errors and ensure proper cooling.
What happens if I leave the CHA_FAN header empty?
Nothing negative. Your motherboard will boot normally. Unlike the CPU_FAN header, there is no boot-time check for chassis fans. However, your system may have reduced airflow without case fans.
How many fans can I connect to one CHA_FAN header?
Most CHA_FAN headers can deliver up to 1 amp of current, which is enough for 2-3 standard case fans. High-power fans may require more current, so check the fan specifications and the header’s power rating.
Is there a difference between CHA_FAN and SYS_FAN?
No. CHA_FAN and SYS_FAN are the same type of header. CHA_FAN is the older label, while SYS_FAN is the newer, more generic designation. Both are designed for case fans.
Can I control case fan speed without connecting to the motherboard?
Yes. You can connect fans directly to the power supply using a Molex adapter or use a separate fan controller. However, you lose automatic temperature-based speed control. A motherboard header or fan controller gives you the best balance of performance and noise.
Do I need to configure anything in BIOS after connecting case fans?
It is not required, but highly recommended. Most motherboards have default fan profiles that work well, but customizing the fan curve in BIOS lets you optimize the balance between noise and cooling for your specific setup.
Why is my CHA_FAN not showing up in BIOS?
If a fan is connected to a CHA_FAN header but not showing in BIOS, the connection may be loose, the fan cable may be damaged, or the header itself may be faulty. Try reconnecting the fan or testing with a different header.