Can 3-Pin Fans Plug into 4-Pin Headers? (2026 Complete Guide)
If you’ve ever found yourself holding a 3-pin fan connector while staring at a 4-pin motherboard header, you’re not alone. This is one of the most common questions in PC building, and the answer might surprise you. Yes, 3-pin fans can absolutely plug into 4-pin headers, and your motherboard will handle it automatically. However, there are important details about how the fan operates in this configuration that every PC builder should understand. In this 2026 guide, we’ll explain exactly what happens when you mix fan types, how control methods differ, and best practices for optimal cooling and noise management.
Table of Contents
- Short Answer: Yes, But With Caveats
- 3-Pin vs 4-Pin Connectors Explained
- DC vs PWM Control: What’s the Difference?
- What Happens When You Mix Fan Types
- Best Practices for Mixed Fan Configurations
- Common Mistakes to Avoid
- Frequently Asked Questions
- Conclusion
Short Answer: Yes, But With Caveats
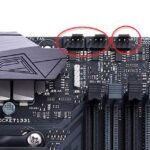
Yes, you can physically plug a 3-pin fan into a 4-pin header, and it will work. The connectors are designed to be physically compatible — the extra pin on the 4-pin header simply won’t be connected. Your motherboard will automatically detect that a 3-pin fan is connected and switch to DC (voltage) control mode instead of PWM control.
The main caveat is that you lose the precise speed control that PWM provides. A 3-pin fan in a 4-pin header operates using DC voltage regulation, which limits the minimum speed the fan can run at and provides less granular speed adjustments. For most users, this difference is acceptable, but understanding the technical details helps you make informed decisions about your cooling setup.
3-Pin vs 4-Pin Connectors Explained
To understand why mixing works but has limitations, let’s examine what each pin on these connectors does:
| Pin | 3-Pin Function | 4-Pin Function |
|---|---|---|
| Pin 1 | Ground (GND) | Ground (GND) |
| Pin 2 | +12V Power | +12V Power |
| Pin 3 | Tachometer (RPM signal) | Tachometer (RPM signal) |
| Pin 4 | N/A (doesn’t exist) | PWM Control Signal |
The first three pins are identical between both connector types. Pin 1 provides the ground connection, Pin 2 delivers the 12V power that spins the motor, and Pin 3 sends the tachometer signal that allows the motherboard to read the fan’s RPM. The critical difference is Pin 4, which carries the PWM (Pulse Width Modulation) control signal.
PWM is a method of controlling fan speed by rapidly switching the power on and off at a specific frequency. The ratio of on-time to off-time (the duty cycle) determines the effective power delivered to the fan motor. This allows for precise speed control without changing the voltage level.
When a 3-pin fan connects to a 4-pin header, the PWM pin has nothing to connect to. The motherboard detects this and falls back to DC voltage control, adjusting speed by varying the voltage on Pin 2 instead. This fundamental difference in control method is what creates the limitations when mixing fan types.
DC vs PWM Control: What’s the Difference?
Understanding the difference between DC and PWM control helps explain why mixing fan types affects performance:
| Aspect | DC Control (3-Pin) | PWM Control (4-Pin) |
|---|---|---|
| Control Method | Voltage adjustment | Duty cycle modulation |
| Minimum Speed | 40-50% of max | 20-30% of max |
| Speed Range | Narrower | Wider |
| Low-Speed Noise | May hum or vibrate | Runs smoother |
| Response Time | Slower changes | Faster changes |
| Power Efficiency | Less efficient | More efficient |
| Motor Stress | Higher at low speeds | Lower overall |
DC control works by reducing the voltage supplied to the fan motor. At lower voltages, the motor spins slower. However, motors need a minimum voltage to start spinning and maintain stable rotation. This is why DC-controlled fans have a higher minimum speed — below a certain voltage, the fan stalls or runs erratically.
PWM control keeps the voltage constant (usually 12V) but rapidly switches it on and off. The motor’s inertia smooths out these pulses, resulting in a steady speed determined by the duty cycle. This allows fans to run much slower while maintaining stable rotation, which is why PWM fans can achieve lower minimum speeds.
For most users, the practical difference is in noise levels. A PWM fan running at 30% speed will be quieter and smoother than a DC fan forced to run at its minimum of 40-50%. This makes PWM the preferred choice for quiet builds, though DC control works perfectly well for standard configurations.
What Happens When You Mix Fan Types
When you plug a 3-pin fan into a 4-pin header, here’s exactly what happens:
Detection Phase
When you first power on the system, the motherboard sends a signal on Pin 4 to detect whether a PWM fan is connected. If no response is received (because the 3-pin fan doesn’t have the PWM pin), the motherboard switches the header to DC control mode. This detection happens automatically and requires no user intervention.
Operation Mode
The fan receives power through Pin 2, and the motherboard controls speed by adjusting the voltage on that pin. The tachometer signal on Pin 3 continues to work normally, so the motherboard can still read and report the fan’s RPM. You’ll see the fan speed in BIOS, hardware monitoring software, and fan control utilities.
Speed Control Limitations
With DC control, the fan’s speed range is limited. Most fans cannot run below 40-50% of their maximum speed without stalling or becoming unstable. This means a 1200 RPM fan might only be able to slow down to 500-600 RPM instead of the 200-300 RPM achievable with PWM control.
Noise Characteristics
At lower speeds, DC-controlled fans may exhibit more noise or vibration than PWM-controlled fans. The voltage variation can cause slight motor hum, particularly at very low speeds. PWM fans generally run smoother at low RPMs because the constant voltage keeps the motor more stable.
For more information about case fan basics and connections, check our guide on how to connect case fans to power supply. Understanding the fundamentals of fan connections helps you make better decisions about your cooling setup.
Best Practices for Mixed Fan Configurations
If you’re working with a mix of 3-pin and 4-pin fans, follow these best practices for optimal results:
Prioritize PWM for Critical Locations
Use 4-pin PWM fans in locations where quiet operation matters most, such as front intake fans near your ears or top exhaust fans in a quiet office environment. Reserve 3-pin fans for less noise-sensitive locations like rear exhaust or supplemental cooling.
Configure Fan Curves Appropriately
When setting up fan curves in BIOS or software, account for the different minimum speeds. Set higher minimum speeds for 3-pin fans to prevent stalling, and lower minimums for PWM fans to take advantage of their wider speed range. Most fan control software allows you to set different curves for different headers.
Match Fans When Possible
When adding new fans to your system, try to match the connector type of existing fans on the same header or splitter. This ensures consistent behavior and simplifies speed control configuration. If you’re replacing fans, consider upgrading to all PWM for uniform control.
Test and Monitor
After installing mixed fan types, monitor your temperatures and noise levels. Use hardware monitoring software to verify that all fans are running at expected speeds. Pay attention to any unusual sounds that might indicate a fan struggling at its minimum DC speed.
Consider Fan Hubs for Complex Setups
If you have many fans of mixed types, a quality fan hub can simplify management. Many hubs support both 3-pin and 4-pin fans and provide independent control or grouped control options. This is particularly useful in cases with many fan mounting locations.
If you’re working with fans that came pre-installed in your case, check our guide on whether PC cases come with fans. Understanding what’s included helps you plan any upgrades or additions to your cooling setup.
Common Mistakes to Avoid
When working with mixed fan configurations, several common mistakes can lead to suboptimal performance or frustration:
Mistake 1: Expecting PWM Control from 3-Pin Fans
Even when connected to 4-pin headers, 3-pin fans cannot use PWM control. Don’t be surprised if your fan control software shows DC mode or if the fan doesn’t slow down as much as expected. This is normal behavior, not a malfunction.
Mistake 2: Setting PWM-Only Fan Curves
Some advanced fan control software allows you to set PWM-specific curves that go below the minimum speed achievable with DC control. If you apply such a curve to a 3-pin fan, the fan may stall or behave unpredictably. Always use appropriate control modes for each fan type.
Mistake 3: Ignoring Minimum Speed Requirements
3-pin fans have higher minimum speeds than 4-pin fans. If you set an aggressive quiet curve designed for PWM fans, your 3-pin fans may stall at low temperatures. Adjust your curves to account for the higher minimum speed of DC-controlled fans.
Mistake 4: Assuming All Headers Behave the Same
Not all motherboard fan headers are created equal. Some headers may have different current ratings, control capabilities, or default behaviors. Check your motherboard manual for specific header specifications, especially if you’re connecting power-hungry fans or mixing fan types across different headers.
Mistake 5: Forgetting About Fan Splitters
If you’re using a fan splitter, all fans on that splitter will use the same control method. You cannot mix DC and PWM fans on the same splitter effectively. Plan your fan distribution across headers to keep DC and PWM fans separated when possible.
Frequently Asked Questions
Will a 3-pin fan damage a 4-pin header?
No, a 3-pin fan will not damage a 4-pin header. The connectors are physically compatible, and the motherboard is designed to handle both types. The unused PWM pin simply has no connection, and the motherboard automatically adjusts its control method. There’s no risk of damage from connecting a 3-pin fan to a 4-pin header.
Can I convert a 3-pin fan to 4-pin?
You cannot physically convert a 3-pin fan to 4-pin because the PWM control circuitry is in the fan’s motor controller, not just the connector. Simply adding a 4th wire wouldn’t enable PWM control. Some aftermarket fan controllers can add basic speed control to 3-pin fans, but they use DC voltage regulation, not true PWM.
Do 3-pin fans run at full speed in 4-pin headers?
No, 3-pin fans do not automatically run at full speed in 4-pin headers. The motherboard detects the fan type and provides DC voltage control, allowing the fan to run at variable speeds. The fan will only run at full speed if you manually set it to 100% or if the system is under heavy thermal load.
Which is better for case fans, 3-pin or 4-pin?
For most users, 4-pin PWM fans are better because they offer wider speed control ranges and quieter operation at low speeds. However, 3-pin fans are perfectly adequate for case cooling and cost less. The difference is most noticeable in quiet builds where fans need to spin very slowly at idle. For basic builds, either type works well.
Can I use a 4-pin fan in a 3-pin header?
Yes, a 4-pin PWM fan will work in a 3-pin header, but it will operate using DC voltage control instead of PWM. The 4th pin (PWM) simply won’t be connected. The fan will work but won’t benefit from PWM’s precise speed control. For more details, read our guide on connecting case fans to power supply.
Why do some fans have both 3-pin and 4-pin connectors?
Some manufacturers include both connector types to maximize compatibility. This allows the same fan to work with older motherboards that only have 3-pin headers and newer boards with 4-pin headers. The fan operates optimally with the 4-pin connection but remains functional with 3-pin.
Does mixing fan types affect RGB lighting?
Mixing 3-pin and 4-pin fans doesn’t directly affect RGB lighting, as RGB uses separate connectors (usually 3-pin 5V or 4-pin 12V). However, if your RGB is powered through the same fan connector (proprietary systems), the connector type matters for RGB functionality. Standard fans have separate power and RGB connections.
Will my motherboard report RPM for 3-pin fans?
Yes, the tachometer signal (Pin 3) works the same on both 3-pin and 4-pin fans. Your motherboard will read and report the fan’s RPM in BIOS, hardware monitoring software, and fan control utilities. The RPM reading is independent of the control method used.
Conclusion
The ability to plug 3-pin fans into 4-pin headers is a testament to the backward compatibility built into PC hardware. While the fan won’t benefit from PWM’s precise speed control, it will function correctly using DC voltage regulation. For most users and most builds, this difference is negligible — your fans will still provide adequate cooling with reasonable noise levels.
When planning your cooling setup, remember that 4-pin PWM fans offer the best control and quietest operation, while 3-pin fans remain a cost-effective and perfectly functional option. The key is understanding how each type behaves so you can configure your fan curves appropriately and avoid common mistakes like setting speeds too low for DC-controlled fans.
Whether you’re building a new PC or upgrading an existing one, the compatibility between 3-pin and 4-pin connectors gives you flexibility in fan selection. Focus on choosing fans with the right airflow, noise levels, and build quality for your needs, and let the motherboard handle the control method automatically. For more information about fan configurations and cooling optimization, check our guides on connecting case fans, case fan inclusion, and lowering GPU temperature.