Can I Plug a Fan Into CPU Opt (2026 Complete Guide)
If you have ever stared at your motherboard and wondered whether you can plug a fan into the CPU_OPT header, you are not alone. This is one of the most common questions PC builders ask when they run out of fan headers or want to add extra cooling. The short answer is yes, you can plug a fan into the CPU_OPT header, but there are important details you need to understand before doing so. In this comprehensive 2026 guide, we will walk you through everything about the CPU_OPT header, how it differs from the CPU_FAN header, when it makes sense to use it, and what risks or limitations you should be aware of. Whether you are building your first PC or troubleshooting an overheating issue, this article will give you the knowledge you need to make the right decision.
Last updated: July 19, 2026 — Estimated reading time: 12 minutes
Table of Contents
- What Is the CPU_OPT Header?
- CPU_FAN vs CPU_OPT: What Is the Difference?
- Can You Plug a Fan Into CPU_OPT?
- How to Plug a Fan Into CPU_OPT Safely
- What Fan Types Work With CPU_OPT?
- Will the Fan Speed Be Controlled?
- Risks and Limitations of Using CPU_OPT
- When Should You Use CPU_OPT?
- Alternatives to CPU_OPT
- Troubleshooting Fan Issues
- Frequently Asked Questions
What Is the CPU_OPT Header?
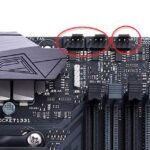
The CPU_OPT header is a secondary fan header found on many modern motherboards. It stands for “CPU Optional” and is designed to provide an additional connection point for cooling fans near the processor area. Most mid-range and high-end motherboards include this header, though budget boards may not. The header is typically located very close to the CPU_FAN header, usually just above or beside the CPU socket area.
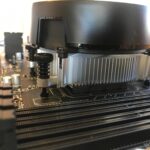
The primary purpose of the CPU_OPT header was originally intended for use with dual-fan CPU coolers. If you had a heatsink that required two fans for optimal cooling, one fan would connect to CPU_FAN and the second would connect to CPU_OPT. Over time, however, builders started using this header for case fans and other cooling accessories simply because they needed more fan header connections.
The CPU_OPT header delivers the same type of power as the CPU_FAN header. It typically provides up to 1 amp of current at 12 volts, which translates to approximately 12 watts of power. This is more than sufficient for any standard case fan or CPU cooler fan you would plug into it. The header supports the same 3-pin and 4-pin fan connectors that the CPU_FAN header supports, making it fully compatible with virtually all consumer PC fans on the market.
CPU_FAN vs CPU_OPT: What Is the Difference?
Understanding the distinction between CPU_FAN and CPU_OPT is essential before you connect anything. While both headers deliver the same power and support the same fan types, they behave differently at the BIOS and software level.
| Feature | CPU_FAN | CPU_OPT |
|---|---|---|
| Default monitoring | Active in BIOS by default | May not be monitored by default |
| CPU temperature based speed | Yes, directly tied to CPU temp | May follow CPU temp or may need manual setup |
| Boot warning if empty | Yes, many boards warn if no fan detected | No warning typically |
| Power output | Up to 1A / 12W | Up to 1A / 12W |
| 3-pin and 4-pin support | Yes | Yes |
| PWM control | Full PWM support | Full PWM support |
The most significant difference is in monitoring behavior. The CPU_FAN header is the primary header the BIOS watches. If nothing is connected to CPU_FAN, many motherboards will refuse to boot or display a warning message. The CPU_OPT header, on the other hand, is treated as a supplementary connection. The BIOS may not actively monitor it unless you configure it to do so manually through the fan control settings.
Some motherboard manufacturers, particularly ASUS and MSI, allow you to configure the CPU_OPT fan curve independently in the BIOS fan control section. Others may simply mirror the CPU_FAN behavior or run the connected fan at a fixed speed. It is worth checking your specific motherboard manual to understand exactly how the CPU_OPT header is configured on your board.
Can You Plug a Fan Into CPU_OPT?
Yes, you absolutely can plug a fan into the CPU_OPT header. The header is designed to power and control fans, and connecting a standard case fan, CPU cooler fan, or any other 3-pin or 4-pin fan to it is perfectly safe. The electrical specifications are the same as the CPU_FAN header, so there is no risk of damaging the fan or the motherboard by using this connection.
When you plug a fan into CPU_OPT, it will receive power immediately upon system startup. The fan will spin, and its speed will be determined by whatever fan control profile the BIOS has set for that header. In many cases, this means the fan will respond to CPU temperature just like a fan connected to CPU_FAN would respond.
There are a few scenarios where plugging a fan into CPU_OPT makes perfect sense. If you are installing a tower cooler with two fans, the second fan naturally goes on CPU_OPT. If you have a case with excellent airflow design and you want one of the front intake fans to respond directly to CPU temperature, CPU_OPT is a logical choice. And if you simply have more fans than headers, using CPU_OPT for an extra fan is a practical solution.
How to Plug a Fan Into CPU_OPT Safely
Connecting a fan to the CPU_OPT header is straightforward, but following a few best practices will ensure everything works correctly.
First, make sure your computer is completely powered off and unplugged from the wall outlet before you open the case. Even in standby mode, some motherboard headers retain power, and you do not want to risk a short circuit while handling components.
Locate the CPU_OPT header on your motherboard. It is almost always near the CPU socket area, typically labeled clearly on the motherboard PCB. Check your motherboard manual if you have trouble finding it, as the label can sometimes be hidden under other components once the build is complete.
Align the fan connector with the header pins. The connector is keyed with a small tab that matches a notch on the header, so it can only be inserted one way. Gently push the connector onto the pins until it is fully seated. Do not force it. If it does not slide on easily, check the orientation and make sure the key tab is aligned properly.
After connecting the fan, route the cable neatly to avoid it interfering with other components or blocking airflow. Use cable ties or the built-in cable management channels in your case to keep things tidy.
Once everything is connected, plug your computer back in, power it on, and enter the BIOS to verify that the fan is detected and spinning. Navigate to the hardware monitor or fan control section to check the RPM reading for the CPU_OPT header. If the fan is detected and spinning, you can then configure the fan curve if your BIOS supports it.
What Fan Types Work With CPU_OPT?
The CPU_OPT header supports the same fan types as any other fan header on your motherboard. This includes both 3-pin DC fans and 4-pin PWM fans. Understanding the difference between these two types will help you get the best performance from your setup.
3-pin DC fans control their speed by varying the voltage supplied to them. At 12 volts they run at full speed, and the motherboard reduces the voltage to slow them down. These fans are common in budget builds and older systems. When plugged into CPU_OPT, a 3-pin fan will work fine, though the speed control may be less precise than with a PWM fan.
4-pin PWM fans use Pulse Width Modulation to control speed. The fourth pin carries a control signal that tells the fan motor how fast to spin, independent of the voltage. This allows for much more precise speed control, including the ability to run fans at very low speeds for near-silent operation. PWM fans are the preferred choice for most modern builds, and they work perfectly with the CPU_OPT header.
Some fans come with proprietary connectors, particularly those bundled with certain AIO liquid coolers. These fans may not work directly with standard motherboard headers without an adapter. If your cooler came with a splitter cable or a dedicated fan hub, you may need to use those instead of connecting directly to CPU_OPT.
RGB fans that include lighting often have separate power connectors for the fan motor and the RGB lighting. The fan motor connector will work with CPU_OPT just like any other fan, but the RGB connector needs to go to an RGB header or a separate RGB controller.
Will the Fan Speed Be Controlled?
Whether the fan speed is controlled when connected to CPU_OPT depends on your motherboard and BIOS settings. In most modern motherboards, the CPU_OPT header supports full fan speed control through the BIOS and through software utilities.
When you first connect a fan to CPU_OPT, the default behavior varies by manufacturer. Some boards will run the fan at full speed until you configure a fan curve. Others may apply a default quiet profile that keeps the fan at low RPMs until the system gets warm. And some boards may mirror the behavior of the CPU_FAN header, so the CPU_OPT fan follows the same speed curve as the primary CPU fan.
To configure the fan speed for CPU_OPT, enter your BIOS and look for the hardware monitor or fan control section. On ASUS boards this is typically under Q-Fan Control. On MSI boards it is under Hardware Monitor. On Gigabyte boards it is under Smart Fan. On ASRock boards it is under Fan-Tastic Tuning. Each of these utilities allows you to set custom temperature-to-speed curves for individual fan headers.
If your BIOS does not provide granular control for CPU_OPT, you can often use desktop software to adjust fan speeds. Popular utilities include SpeedFan (though it is older and not always compatible with modern hardware), and manufacturer-specific tools like ASUS Fan Xpert, MSI Dragon Center, or Gigabyte SIV. These tools read the same temperature sensors and control the same fan headers as the BIOS, giving you the ability to fine-tune fan behavior without rebooting.
Risks and Limitations of Using CPU_OPT
While using the CPU_OPT header is generally safe and straightforward, there are some risks and limitations to be aware of.
The most common issue is a lack of default monitoring. Since the BIOS does not always actively monitor the CPU_OPT header, a fan failure on this header may go unnoticed. If a fan connected to CPU_OPT stops working, the system will not warn you, and temperatures could rise without any alarm. This is particularly concerning if the fan is providing critical cooling to the CPU or other heat-sensitive components.
Another limitation is power capacity. Most CPU_OPT headers are rated for 1 amp or about 12 watts. While this is enough for a single fan, you should never try to daisy-chain multiple fans to this header using splitters unless you have verified that the combined current draw stays under 1 amp. Exceeding the rated current can damage the header, the motherboard, or both.
Some motherboards share the CPU_OPT circuit with other headers, which means the total available current is split between them. If you have a high-performance fan drawing close to the maximum on CPU_OPT and another device on a shared circuit, you could exceed the combined limit. Again, consult your motherboard manual for the specific electrical specifications.
There is also the issue of BIOS fan curve configuration. Not all motherboards allow independent fan curve control for CPU_OPT. If your board does not support it, the fan may run at a fixed speed that is either too loud or too slow for your needs. In this scenario, you may need to rely on third-party software or accept the default behavior.
When Should You Use CPU_OPT?
There are several practical scenarios where using the CPU_OPT header makes perfect sense.
If you are running a dual-fan tower cooler like the Noctua NH-D15, the second fan naturally connects to CPU_OPT. This is the intended use case, and the header will work perfectly for this purpose, with both fans responding to CPU temperature.
If your case has more fans than available fan headers, CPU_OPT provides an extra connection point. This is common in cases with three or more front intake fans, multiple exhaust fans, and rear fans. Rather than using a fan hub or splitter cable, using CPU_OPT for one of these fans is a clean and simple solution.
For builders who want specific fans to respond to CPU temperature, CPU_OPT is useful. For example, if you have a top-mounted radiator and want the radiator fans to respond directly to CPU temperature, connecting them to CPU_FAN and CPU_OPT ensures they follow the CPU thermal load rather than case temperature.
If you are troubleshooting a cooling issue and need to add an extra fan quickly, CPU_OPT is an easy option that does not require additional hardware like splitters or hubs. Plug the fan in, and it starts working immediately.
Finally, if you are building in a small form factor case where cable routing is challenging, using CPU_OPT for a nearby fan can simplify cable management since the header is typically located close to the CPU area where cables are already being routed.
Alternatives to CPU_OPT
If CPU_OPT is not available or not suitable for your needs, there are several alternatives for connecting additional fans.
Fan splitter cables allow you to connect two or more fans to a single motherboard header. These are inexpensive and widely available. However, you need to ensure the combined current draw of all fans on the splitter does not exceed the header’s rated capacity. Most standard case fans draw about 0.2 to 0.3 amps, so you can typically connect two or three fans to one header without issues.
Powered fan hubs are another option, particularly for builds with many fans. These hubs connect to a single motherboard header for speed control signal and to the power supply directly for power. This means they can support many more fans than a single motherboard header could power alone. Popular options include the Noctua NA-FH1 and various PWM fan hubs from companies like Silverstone and Phanteks.
Fan controllers that mount in a 5.25-inch drive bay provide manual speed control knobs for multiple fans. While these are less common in modern builds due to the decline of optical drive bays, they are still available and provide hands-on control without requiring BIOS configuration.
Some cases include built-in fan hubs or controllers on the back of the motherboard tray. These are often connected to the case’s front panel and provide convenient connection points for all the case fans. If your case has one of these, it may reduce or eliminate the need to use CPU_OPT.
You can also connect case fans directly to the power supply using a Molex adapter. This runs the fans at full speed all the time without any speed control, which is not ideal for noise but is a simple solution if you need maximum airflow. For more details on connecting fans to the power supply, check out our guide on how to connect case fans to the power supply.
Troubleshooting Fan Issues
If you have connected a fan to CPU_OPT and it is not working as expected, here are some common issues and solutions.
If the fan is not spinning at all, first verify the physical connection. Make sure the connector is fully seated on the header pins and oriented correctly. A loose or misaligned connection is the most common cause of a non-spinning fan.
If the fan spins but runs at full speed constantly, your BIOS may not be controlling the fan speed on CPU_OPT. Enter the BIOS and check the fan control settings. Look for CPU_OPT specifically and make sure a fan curve is configured. If the BIOS does not support CPU_OPT fan control, try using desktop fan control software.
If the fan is detected in BIOS but the RPM reading shows zero, the fan may have a failed motor or a damaged tachometer wire. Try connecting the fan to a different header to confirm whether the fan itself is faulty.
If your system is overheating even though the fan is spinning, check that the fan is oriented correctly. Fans should be mounted to push air toward the heatsink or through the case in the intended airflow direction. Most fans have arrows printed on the frame indicating the direction of airflow and the direction of blade rotation.
For more information on lowering temperatures in your system, see our guide on how to lower GPU temperature, and for information on fan pin compatibility, read our article on can 3-pin fans plug into 4-pin headers.
Frequently Asked Questions
Will my PC boot without a fan on CPU_FAN if I only use CPU_OPT?
Many motherboards will display a warning or refuse to boot if no fan is detected on the CPU_FAN header. This is a safety feature to prevent running the CPU without cooling. You should always have a fan connected to CPU_FAN. CPU_OPT is meant to supplement CPU_FAN, not replace it.
Can I use a splitter on CPU_OPT to run two fans?
You can use a splitter on CPU_OPT as long as the combined current draw of both fans stays within the header’s rated limit, typically 1 amp. Most standard fans draw 0.2 to 0.3 amps, so two fans should be fine. Check your motherboard manual for the specific current rating.
Does CPU_OPT support PWM fans?
Yes, CPU_OPT supports both 3-pin DC and 4-pin PWM fans. The header provides the same electrical connections as CPU_FAN, including the PWM signal pin on 4-pin headers.
Is CPU_OPT the same as SYS_FAN?
No, CPU_OPT and SYS_FAN headers are different. CPU_OPT is typically tied to CPU temperature for fan speed control, while SYS_FAN headers are tied to motherboard or case temperature. However, both deliver the same power and support the same fan types.
Can I plug a water pump into CPU_OPT?
Some AIO liquid cooler pumps can be connected to CPU_OPT, but it is generally better to use the dedicated AIO_PUMP header if your motherboard has one. Pump headers typically provide higher current (up to 2 amps) compared to CPU_OPT (1 amp), which is important since some pumps draw more power than standard fans.
What happens if I leave CPU_OPT empty?
Nothing happens. Leaving CPU_OPT empty will not cause any errors, warnings, or boot issues. It is an optional header, and the system will function normally without anything connected to it.
Can I control CPU_OPT fan speed from Windows?
Yes, most motherboard manufacturers provide desktop software that allows you to control fan speeds, including CPU_OPT. ASUS Fan Xpert, MSI Dragon Center, and Gigabyte SIV all support this. You can also use third-party tools, though compatibility varies with modern hardware.
Is CPU_OPT always located near the CPU socket?
In most motherboards, yes. The CPU_OPT header is typically placed near the CPU_FAN header for convenience. However, the exact location varies by motherboard manufacturer and model. Check your motherboard layout diagram in the manual for the precise location.