How to Test PC Fans Without Motherboard (2026 Complete Guide)
Last updated: July 19, 2026 | Estimated reading time: 12 minutes
How to Test PC Fans Without Motherboard in 2026
Whether you are troubleshooting a noisy computer, building a new rig, or salvaging parts from an old system, knowing how to test PC fans without a motherboard is an essential skill. A malfunctioning fan can lead to overheating, throttling, and even permanent hardware damage. Testing fans independently allows you to quickly isolate whether the issue lies with the fan itself or another component in your system. In this comprehensive guide, we will walk you through multiple methods to test your PC fans without relying on a motherboard, along with tips on diagnosing common problems.
Table of Contents
- Why Test PC Fans Without a Motherboard?
- Methods Overview
- Method 1: Direct PSU Connection
- Method 2: Using a Dedicated Fan Tester
- Method 3: Molex Adapter Method
- Method 4: Battery-Powered Testing
- Understanding 3-Pin vs 4-Pin Fans
- Measuring Fan Performance
- Troubleshooting Common Issues
- Safety Precautions
- Frequently Asked Questions
Why Test PC Fans Without a Motherboard?
There are several scenarios where testing a fan without a motherboard becomes necessary. Perhaps you purchased a used fan and want to verify it works before installation. Maybe your computer is overheating, and you need to determine whether a specific fan has failed. You could also be working on a project that involves repurposing old fans for custom cooling solutions.
Testing fans independently saves time and prevents unnecessary disassembly of your computer. If a fan works outside the system, you know the problem lies elsewhere. If it does not spin or makes unusual noises, you have confirmed the fan needs replacement. This diagnostic approach is especially valuable when dealing with multiple fans, as it allows you to test each one individually without reinstalling them one by one.
Methods Overview
| Method | Difficulty | Cost | Best For |
|---|---|---|---|
| Direct PSU Connection | Easy | Free | Most users |
| Dedicated Fan Tester | Very Easy | $10-$30 | Frequent builders |
| Molex Adapter | Easy | $2-$5 | Quick verification |
| Battery-Powered | Moderate | $5-$10 | Portable testing |
Method 1: Direct PSU Connection
The most straightforward way to test a PC fan without a motherboard is to connect it directly to your power supply unit. Every standard ATX PSU provides 12V power through its Molex connectors, which is exactly what most case fans need to operate. This method works for both 3-pin and 4-pin fans, though you will need to adapt the connector for 3-pin models.
What You Will Need
- A functioning ATX power supply
- A paperclip or small piece of wire
- The fan you want to test
- A Molex adapter or converter (for 3-pin fans)
Step-by-Step Instructions
Step 1: Locate a Molex connector from your PSU. This is the large four-pin connector typically used for older peripherals. It provides both 5V and 12V power rails.
Step 2: If your fan has a Molex connector, plug it directly into the PSU Molex connector. If it has a 3-pin or 4-pin PWM connector, use a Molex-to-fan adapter cable.
Step 3: To turn on the PSU without a motherboard, you need to bridge the green wire (PS_ON) to any black wire (ground) on the 24-pin ATX connector. Use a paperclip to connect pin 16 (green) to any ground pin.
Step 4: Plug in the PSU and switch it on. The fan should immediately begin spinning if it is functional.
Method 2: Using a Dedicated Fan Tester
A dedicated fan tester is a small device designed specifically for testing PC fans. These testers typically include a power source, connector ports for various fan types, and sometimes even a tachometer to measure fan speed. They are affordable, easy to use, and provide the most accurate results.
Most fan testers support 3-pin, 4-pin, and Molex connectors. Some advanced models also measure RPM, voltage, and airflow. If you regularly build or repair computers, investing in a fan tester can save significant time and effort.
How to Use a Fan Tester
Step 1: Connect the fan to the appropriate port on the tester. Match the connector type and orientation.
Step 2: Power on the tester using its built-in battery or external power adapter.
Step 3: Observe the fan. A working fan will spin smoothly and quietly. Note any unusual sounds, wobbling, or failure to start.
Step 4: If your tester has a tachometer, record the RPM reading and compare it to the fan rated specifications. A significant deviation may indicate a failing motor.
Step 5: Test the fan at different voltage levels if your tester supports it. Some fans may work at 12V but fail at 5V, indicating worn bearings that need more power to overcome friction.
Method 3: Molex Adapter Method
A Molex adapter is a simple cable that converts the standard 4-pin Molex connector from your power supply into a fan header. This method is essentially a variation of the direct PSU connection but uses a proper adapter instead of manual wire bridging. It is safer and more reliable than the paperclip method.
Molex adapters are available at most computer hardware stores for just a few dollars. They come in two main configurations: 3-pin to Molex and 4-pin PWM to Molex. The 3-pin version provides constant 12V power, making the fan run at full speed. The 4-pin version may include a resistor to reduce speed for quieter operation.
Benefits of Using Molex Adapters
- No need to bridge PSU wires manually
- Secure connection that won’t come loose
- Available for both 3-pin and 4-pin fans
- Can be used permanently for case fans
To use a Molex adapter, simply connect the fan to one end and the PSU Molex connector to the other. Power on the PSU using the paperclip method or by connecting it to a test motherboard. The fan will immediately receive 12V power and begin spinning if functional.
For more details on connecting fans to your power supply, check our guide on how to connect case fans to power supply.
Method 4: Battery-Powered Testing
Battery-powered testing is the most portable method for testing fans without a motherboard or PSU. This approach uses common batteries to provide the 12V power that most PC fans require. While not ideal for extended testing, it is perfect for quick verification of fan functionality.
Required Components
- Eight AA batteries (each provides 1.5V, totaling 12V when connected in series)
- A battery holder that connects cells in series
- Soldering iron and solder (optional but recommended)
- Wire connectors or alligator clips
- Electrical tape for insulation
Connect eight AA batteries in series using a battery holder to achieve 12V. Wire the positive terminal to the red wire (12V) of the fan and the negative terminal to the black wire (ground). For 3-pin fans, the third wire (tachometer) does not need to be connected for basic testing. For 4-pin PWM fans, you may need to bridge the PWM wire to the 12V wire to force maximum speed.
Understanding 3-Pin vs 4-Pin Fans
When testing fans, it is important to understand the difference between 3-pin and 4-pin connectors, as they operate differently and may require different testing approaches.
| Feature | 3-Pin Fan | 4-Pin PWM Fan |
|---|---|---|
| Speed Control | Voltage-based (DC) | Pulse Width Modulation |
| Default Speed | Full speed at 12V | Controlled by motherboard |
| Testing Difficulty | Easy | May need PWM signal |
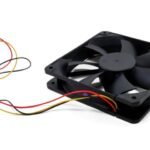
| Wire Colors | Red, Black, Yellow | Black, Yellow, Green, Blue |
For a deeper understanding of fan measurement methods and specifications, visit our article on how are computer fans measured.
Many users wonder about cross-compatibility between these connector types. Our guide on can 3-pin fans plug into 4-pin explains this in detail, including the physical compatibility and electrical considerations.
Measuring Fan Performance
Once you have confirmed that a fan spins, you may want to measure its performance to ensure it meets specifications. Key metrics include RPM (revolutions per minute), airflow (measured in CFM), and noise level (measured in decibels).
A simple way to measure RPM is to use a smartphone tachometer app. Point the phone camera at the fan blades and use a small piece of reflective tape on one blade to get an accurate reading. Alternatively, a dedicated tachometer provides more precise measurements.
Airflow measurement typically requires specialized equipment like an anemometer or a wind tunnel setup. For most home users, comparing the observed RPM to the fan rated specifications is sufficient to determine whether the fan is performing within acceptable parameters.
Noise levels can be assessed by ear, but for accurate measurements, a sound level meter app on your phone can provide reasonable estimates. A healthy fan should operate smoothly without rattling, clicking, or grinding sounds.
Troubleshooting Common Issues
When testing fans, you may encounter several issues that indicate problems with the fan or your testing setup.
Fan Does Not Spin
If the fan does not spin at all, check your power connections first. Ensure all wires are properly seated and that you have the correct polarity. If the connections are secure, the fan motor may be dead. Try rotating the blades manually with your finger before applying power, as some fans have high starting friction when the bearings are worn.
Fan Spins Slowly or Intermittently
A fan that spins slowly or intermittently may have worn bearings that create excessive friction. This is common in older fans or those that have been exposed to dust buildup. Cleaning the fan and lubricating the bearings with a small amount of machine oil can sometimes restore performance, but this is often a temporary fix.
Fan Makes Grinding or Clicking Noises
Unusual noises typically indicate bearing failure. A grinding sound suggests metal-on-metal contact within the bearing assembly, while clicking usually means the blades are hitting something or the bearing is severely worn. In most cases, a noisy fan should be replaced rather than repaired.
Fan Spins in Reverse
If a fan spins in the wrong direction, check the polarity of your power connection. Swapping the positive and negative wires will reverse the rotation. For PWM fans, ensure you have not accidentally connected the PWM signal wire to the wrong pin.
Safety Precautions
Testing PC fans involves working with electrical components, and proper safety precautions are essential. Always disconnect the PSU from the wall outlet before making any modifications to the wiring. Use insulated tools when working with exposed wires, and never leave a running fan unattended during testing.
When using the paperclip method to start a PSU, be aware that the exposed pins carry voltage. Keep the paperclip insulated with electrical tape except at the contact points, and work on a dry, non-conductive surface. If you are uncomfortable working with exposed wiring, use a dedicated fan tester instead.
For battery-powered testing, do not short-circuit the battery holder, and dispose of used batteries properly. If you notice any swelling, leaking, or damage to batteries, stop using them immediately and dispose of them according to local regulations.
Frequently Asked Questions
Can I test a fan using USB power?
Most PC fans require 12V, while USB provides only 5V. This means most fans will not spin or will spin very slowly when connected to USB. However, some 5V fans designed for specific applications can be powered via USB. If you want to try this, ensure you have a fan that specifically supports 5V operation.
How do I know if my fan is PWM or DC controlled?
Count the number of pins on the connector. A 3-pin fan uses DC voltage control, while a 4-pin fan uses PWM. You can also check the fan specifications or look for a fourth wire, which is typically blue or another distinct color.
Is it safe to run a fan at full speed all the time?
Running a fan at full speed is safe from an electrical standpoint, but it will increase noise levels and may reduce the fan lifespan slightly due to increased wear on the bearings. For most fans, this reduction in lifespan is negligible, and running at full speed is perfectly acceptable.
Can I use a car battery to test a PC fan?
A car battery provides 12V, which is the correct voltage for most PC fans. However, car batteries can deliver extremely high current, which could damage a fan if there is a short circuit. Use proper fusing if testing with a car battery, and never leave the connection unattended.
What voltage do case fans typically run at?
Most case fans run at 12V for full speed. Some fans also support 5V operation for quieter, lower-speed performance. The fan specifications will indicate the supported voltage range.
Do I need to test all my fans individually?
If you are experiencing overheating or noise issues, testing each fan individually helps isolate the problem. However, if you are simply verifying that new fans work before installation, a quick visual inspection and short test is usually sufficient.
Can a fan work outside the case but fail inside?
Yes, this can happen if the fan blades are hitting a cable or other obstruction inside the case. It can also occur if the mounting points are warped, causing the fan to vibrate against the case. Always ensure proper clearance and secure mounting when installing fans.
How long should a PC fan last?
Most quality PC fans are rated for 30,000 to 50,000 hours of operation, which translates to roughly 3 to 6 years of continuous use. Factors like dust, temperature, and operating speed affect actual lifespan. Fans running at full speed in dusty environments will typically fail sooner than those in clean, cool conditions.
What is the difference between bearing types in fans?
There are several bearing types used in PC fans: sleeve bearings, rifle bearings, ball bearings, and fluid dynamic bearings. Sleeve bearings are the cheapest but have shorter lifespans. Ball bearings are more durable and can operate in any orientation. Fluid dynamic bearings offer the best balance of longevity, noise, and performance. For more information, check our article on how are computer fans measured.